
Hey there scrappy friends! As you know, we recently celebrated National Scrapbooking Day at the beginning of May, however the Facebook group “For the love of pretty paper” unfortunately had to postpone their celebrations due to illness. They have been holding theirs this weekend instead and challenges are open until midnight on Sunday 9th June. There is also a free paintbrush cut file for you, designed by me, if you visit the group you can grab a coupon for it.
I was invited to sponsor one of the challenges (which of course I did) and asked to produce an example layout using a sketch and “bright colours”. Challenge accepted!

The sketch was not my usual style at all so it was a real push to use it but I absolutely love how it turned out in the end. I’m still trying to complete my Lanzarote album (before we go on holiday again…) so I tried to find suitable photos / topic in this project because the colours were already bright.
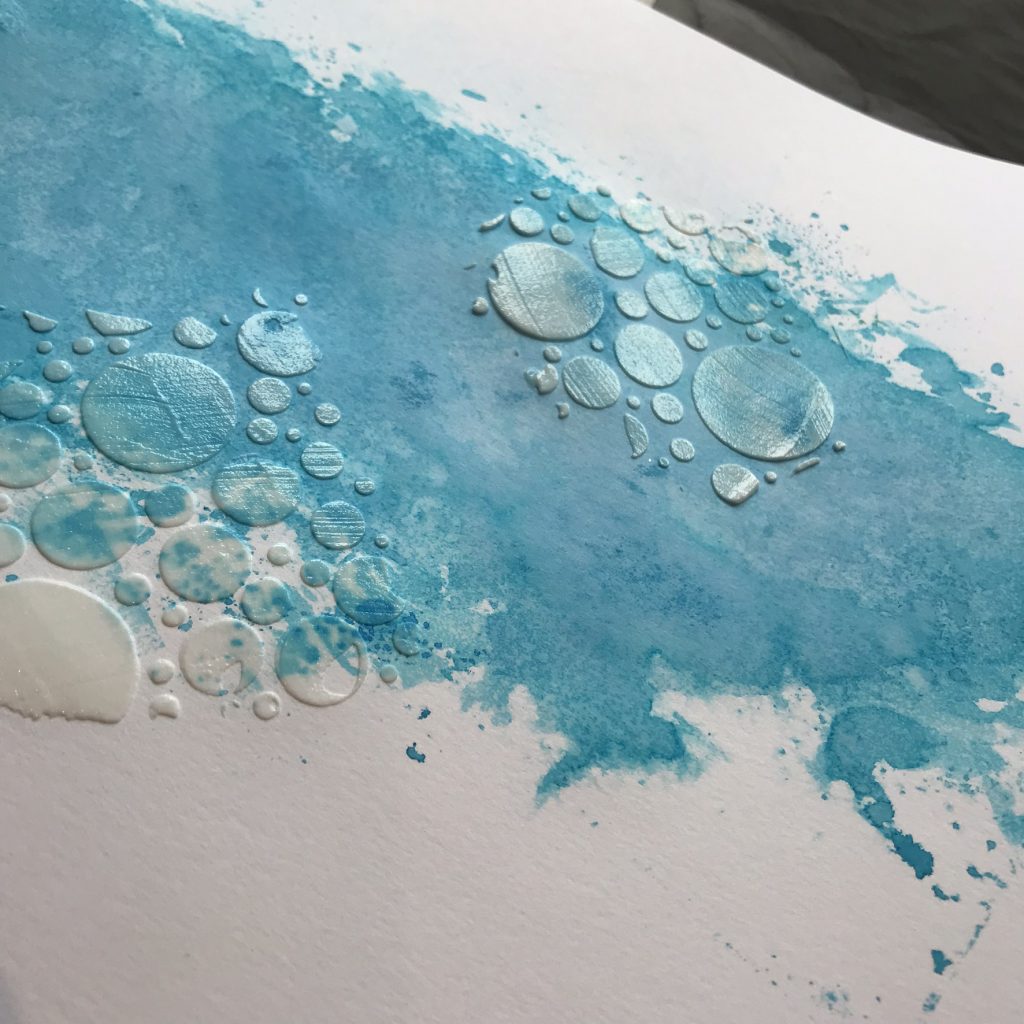
I knew I definitely wanted to pick out the blue of the water and there isn’t a lot of blue left in my papers so I started with the mixed media background. I using the smooshing technique with some Dylusions ink sprays and then when that was dry I used texture paste through a stencil with lots of circles on to represent the water droplets and bubbles in the pools.


I knew I wanted to use my “scribbled circles” cut file for the circular elements and I knew I wanted to squeeze another couple of photos in too. Once I’d worked out how many I’d need, I resized the circles into 2 much smaller sizes, chose a few bright colours from the Simple Stories summer themed collections I’m using and set my Silhouette to work on the scraps.

The tricky part then was adhering the photos inside the scribbled circles because they are quite narrow when they are shrunk down! I shifted the circles around a fair bit so that they looked right with the direction of the flow in the photographs and then started embellishing.

You know I like a border so I had pre-chosen a paper that incorporated all the colours in the other papers and the blue of the mixed media. It really helps to ground a layout when you use a white background.

I brought in some like from the papers with these glittery Thickers and then used a couple of asterisks as embellishments around the page. Does anyone ever use those as part of a title I wonder?

A few stickers and enamel dots and I was ready to journal. But of course I had to journal over the the texture paste which didn’t go well! Never mind, I love it apart from that and it’s another layout in the album and more stash used up.
With love and lots of bright colour xx
728 /
Laura here with my third project for May. I’ve used the Wildflower Wreath to make a thank you card…

I cut the wreath on white card stock just shy of 4” wide. I used some Dylusions ink sprays to add colour to the different sections of the wreath. The leaves are Mushy Peas, the flowers Periwinkle Blue and Laidback Lilac with Vanilla Custard in the centres, all added slightly diluted with water and applied with a paintbrush. I also painted some scrap paper with the Vanilla Custard ink and used it to back the open areas in the middle of the blue flowers.

On a lime card base I added a large loop of cotton to sit behind the wreath. I love the subtle texture that the cotton adds. I could have left it there but decided to add a sentiment. I needed a thank you card so I looked through my Skull And Cross Buns clear stamps for the right stamp. I didn’t want to add black to the card as I thought it would be too harsh. I used a grey ink which had just the right amount of saturation for me.
And you know me by now, I finished up with a sprinkle of sequins. These ones are confetti dots so don’t have a hole in the middle. I rather like these as they are easier to stick down – no glue oozes through the hole!
You can find the process video here.
See you again next month
Laura
497 /
I’m over on the UK Scrap Addicts blog today with my take on the monthly theme, which this month is fussy cutting.

I actually really like fussy cutting because it allows me to be creative in very short bursts. Or just when I feel like chatting rather than thinking too much about page design! I have a couple of bags next to where I sit in the evenings and one has a long term paper stitching project and the other has some papers and project life style cards that I want to cut into. I can also grab these bags when one of my many lunatic family and friends ends up needing a hospital visit…
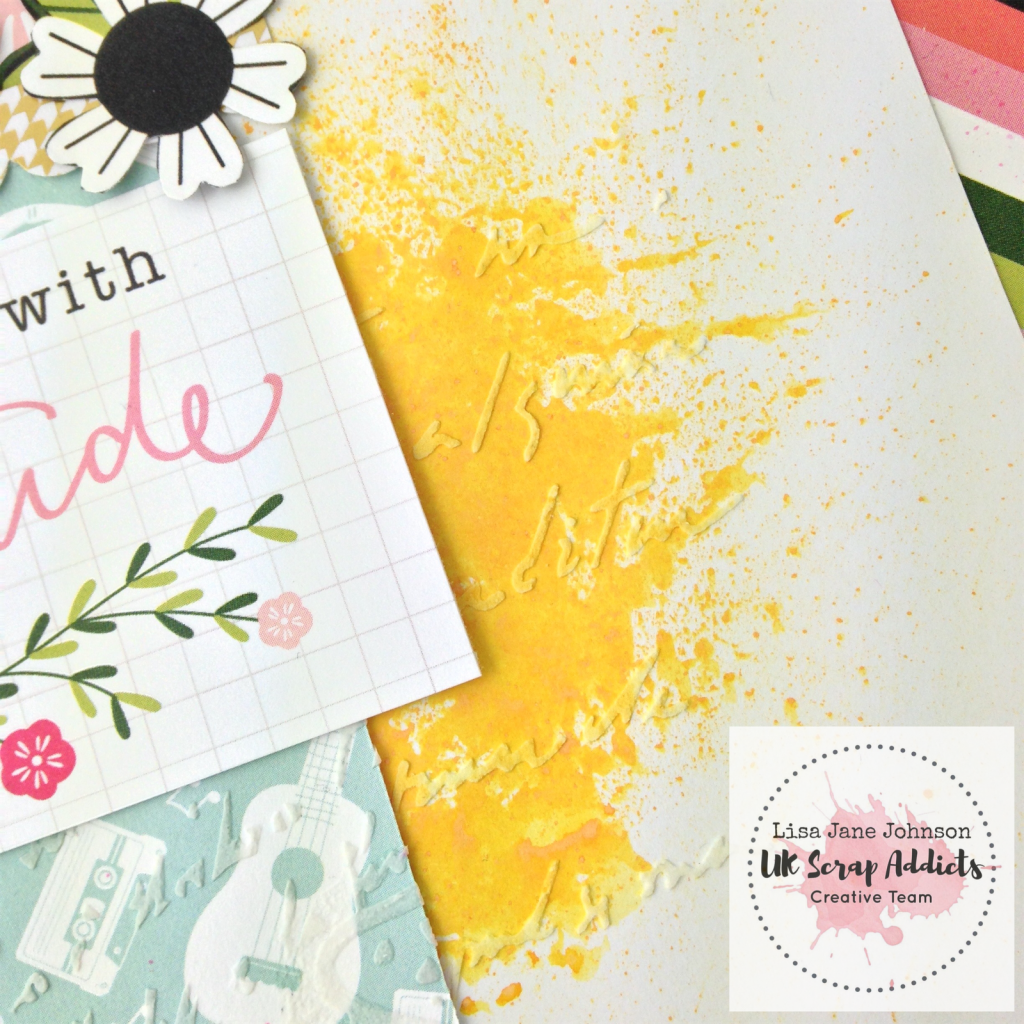
I used a Page Maps sketch for this layout that I did at one of our weekend retreats. I started the background layer with the packaging technique using some Dylusions ink and then went over it with some texture paste using a lovely script stencil which might just be one of my faves. Then I started layering up the lovely papers from Pebbles Girl Squad collection.

There were some flowers in the set but I wanted a few more for the section at the top where they are all poking out so I grabbed a cuppa and started snipping away. I layered them up, popped up some on foam, added some dots in, and basically fiddled around for ages with the placement. But I love how it turned out.
The cut apart sheet included this “Gratitude” quote which was perfect for this very odd photo of some Reece’s chocolate, a cup of tea and a lap top all on a tray. I’d just got home from hospital after my second ankle op last June and my lovely hubby arranged me on the sofa with the 3 things I needed most at that time plus a pillow for my poorly leg. It really is all about the little things…
With love and colour
x
450 /
Hi Lovelies,
Sarah here today to share with you a layout I created using the lovely mandala cut file (available to buy as a download from the shop or as a pre-cut element). I decided to use the cut file as a stencil for this one and used the lovely Tim Holtz Distress Oxide inks (also available in the shop!) I chose colours that would compliment the paper collection I was going to use, which was Hustle and Heart by Amy Tangerine.

Using a blending tool, I created a rainbow effect with the distress oxides, blending colours as I went. I then flicked some water all over the page to get the distressed look. I trimmed the white cardstock and distressed the edges and mounted it onto a gutted piece of patterned paper. I mounted my photo on a contrasting piece of patterned paper and raised it up on foam pads. Once I had my photo in place I used some of the ephemera to decorate – perfect photo for using that pesky tiger I never thought I’d get to use!! I added some detail at the top of the page using a couple of the manufacturing strips and a puffy heart. I added my title using some Thickers and then embellished the page with a large puffy heart and some enamel dots.

Why don’t you give using a cut file as a stencil a go?!
Until next time…
510 /
Terri here with a blog post a little different to the usual scrapbook layouts. As soon as I saw the new ‘Cracked Glass’ cut file (digital or pre-cut) in the shop I knew it would be perfect for a doodle page in my black journal. I did a doodle class with Dyan Reaveley earlier in the year and I loved it! It is so relaxing and once you’ve prepped pages it can be done anywhere, only a white pen needed.

I cut the ‘Cracked Glass’ cut file in leftover cardstock and used as a stencil by drawing round the shapes with a white paint pen. To add some interest to the page I cut out different sections. These can be seen in the next photo as I added a piece of patterned paper to show them for photography purposes.
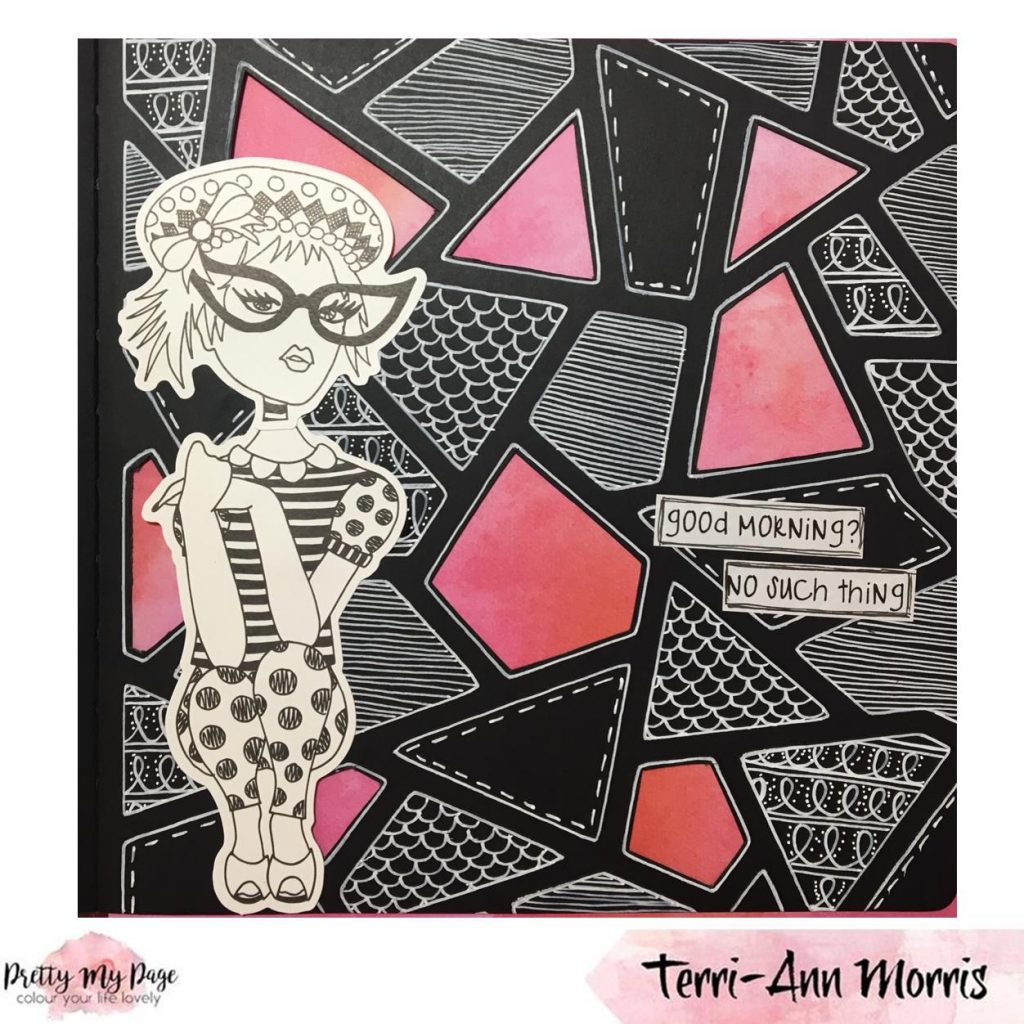
Once I had cut out a few pieces I then doodled in all the others. These doodles are not neat and tidy. The idea is that the process is meant to be relaxing and not stressful, so a few wobbly lines doesn’t matter.

To finish off the journal page I added a couple of stamped images from Dylusions and one of Dyan’s quotes. I love her quirky and sarcastic quotes, they always make me smile.

Thanks for joining us on the blog to see all the different uses of Pretty My Page’s fantastic cut files. Don’t forget to tag us on Facebook and Instagram in photos of any creations using the cut files.
Happy Crafting!
464 /
Hi everyone, it’s Laura here with a layout using bits that normally end up in the bin (Editors note: or on the floor in my case!)

I love to squeeze every last layout of a cutting session. Do you remember the projects from last month using the wonderful Pansies cut file? I cut six pansies to start with as I wasn’t sure how many I would need. In the end the layout only needed five so I made a card with the spare. As I was taking the die cuts off the cutting mat I loved how the negative pieces looked. I used a sheet of transfer tape to keep them in their position. Transfer tape is a low tack sheet that you can pick up intricate designs with. It makes it quick and easy (ish!) to use the negatives that you usually throw away.

I started working on my background using the Blossoms stencil from the shop. It’s currently on sale for just £2-00! I added a layer of texture paste, then some water colour and then another layer of texture paste. I then added the negatives that I had saved on transfer tape. I learned that it’s much easier to adhere them on to card that hasn’t got two layers of texture paste! A little perseverance and they were all stuck down.

I pulled out some goodies from Pink Fresh including ephemera and alphas and set to work making things as pretty as I could. I added some machine stitching to most of the embellishments as things were not sticking very well over the texture paste.

I added a healthy dose of sequins and splatters and thought it still needed something more. I pulled out some pens in matching colours and doodled around a few of the texture paste blossoms.

You can see the layout come together here.
452 /
Happy Star Wars Day! Over on the UK Scrap Addicts Facebook page we have a whole weekend of challenges with a Star Wars theme. No, don’t worry, you don’t need to know anything about Star Wars at all, it’s just a jumping off point to give us some out of this world inspiration.

All challenges are open until midnight on 14th May so do pop over and have a look. There are loads of prizes to be won too, including a pack of stencils from our shop for this “Merry-Sithmas” challenge that went live late Friday night.
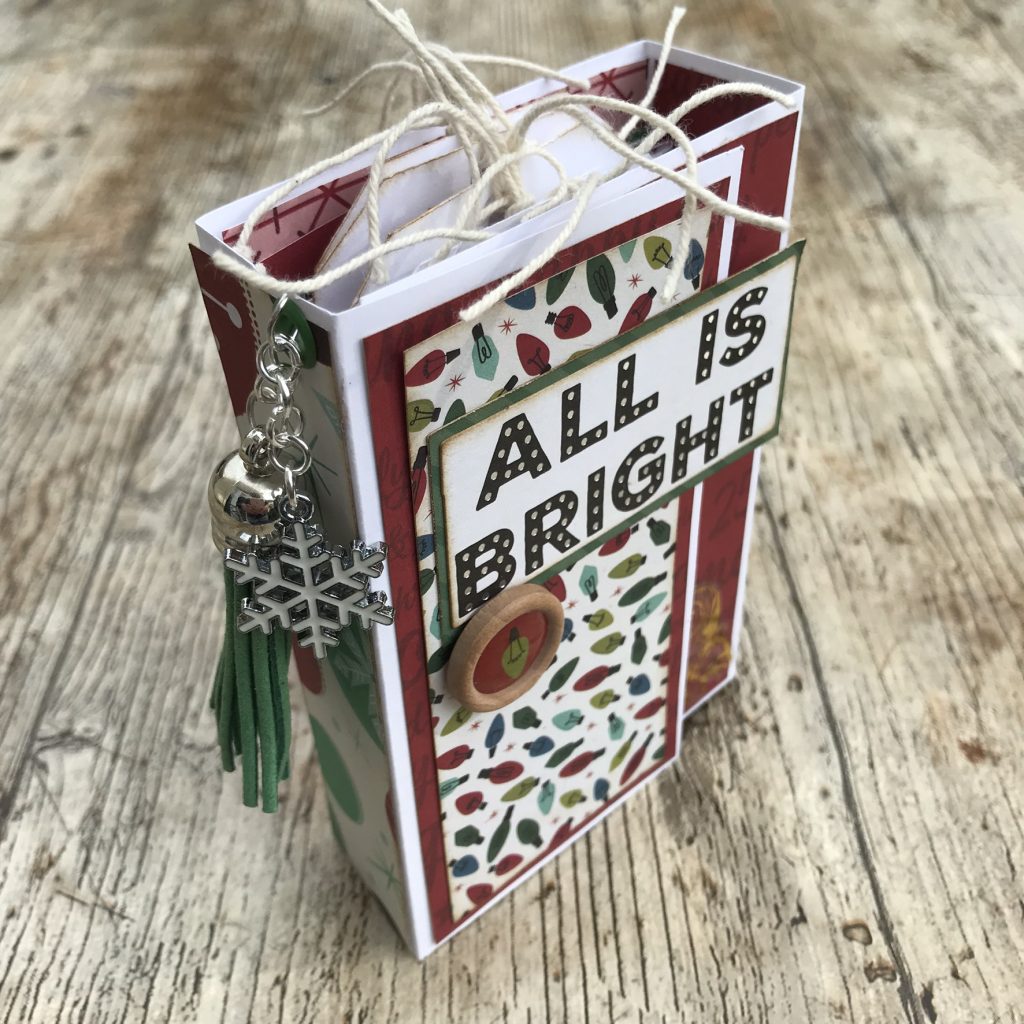
Sithmas is like Christmas but in a Galaxy far far away so this challenge is to scrap about Christmas, or using the colours red and green etc. I took inspiration from the lightsabers too and went for a Christmas mini book all about the lantern parade at Longleat.

I’d already had my many pictures from this event printed by making a collage of 2 photos on a standard 6×4 base, so my first job was to trim them all down and see what I was dealing with in terms of size.

I used the Paige Evans Accordion Mini Book with Tags cut file but as you can see from the photo below, it quickly became apparent that the template was going to be too small…

Instead I used the template to create another mini book on a larger scale and put the original back in my stash for another project. Also I realised that my paper was single sided so instead of adhering the folded sections back to back, I staggered them and overlapped them so that there were no white sections showing but so that it still folded like an accordion.
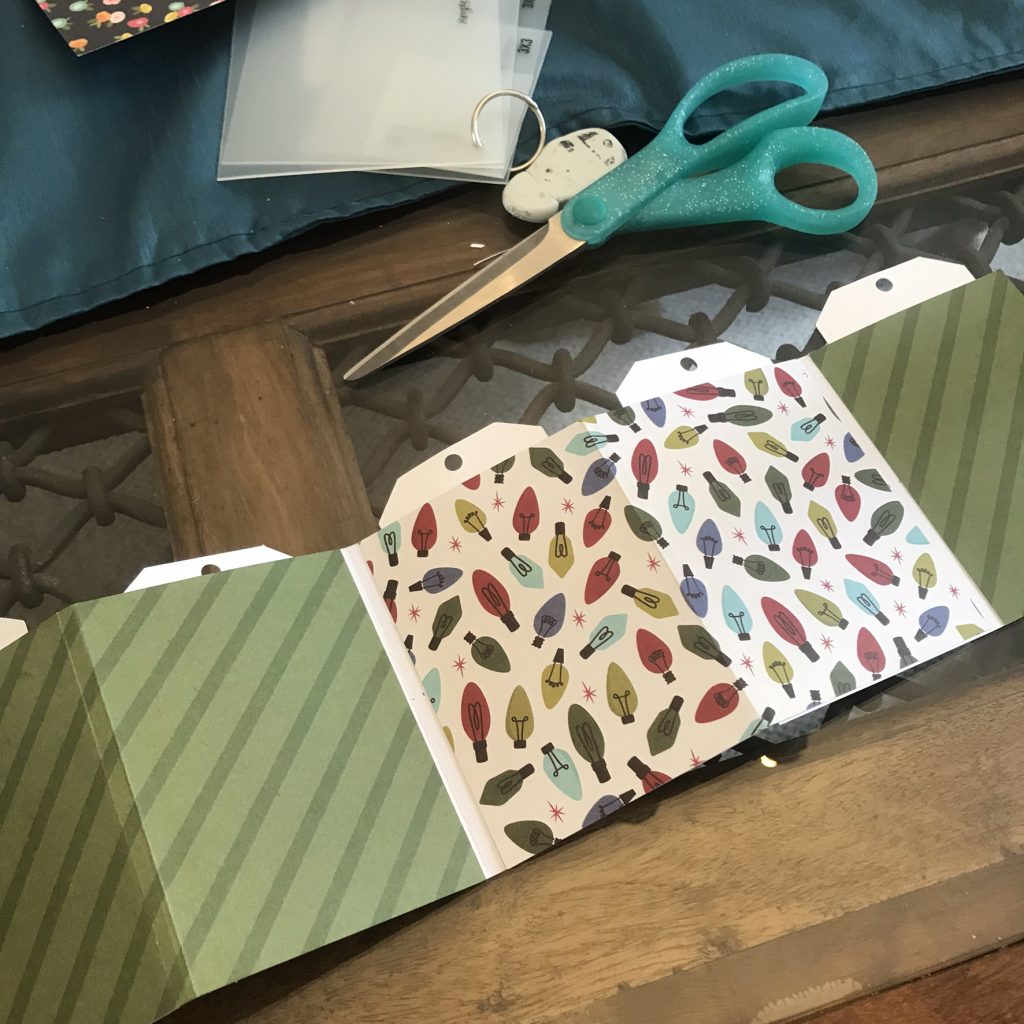
This meant that I ended up with little white borders in between each section which I then had to cover up with a Christmas washi. This was supposed to be a quick project and it had already taken me hours because I hadn’t thought ahead each time I tried to fix something!
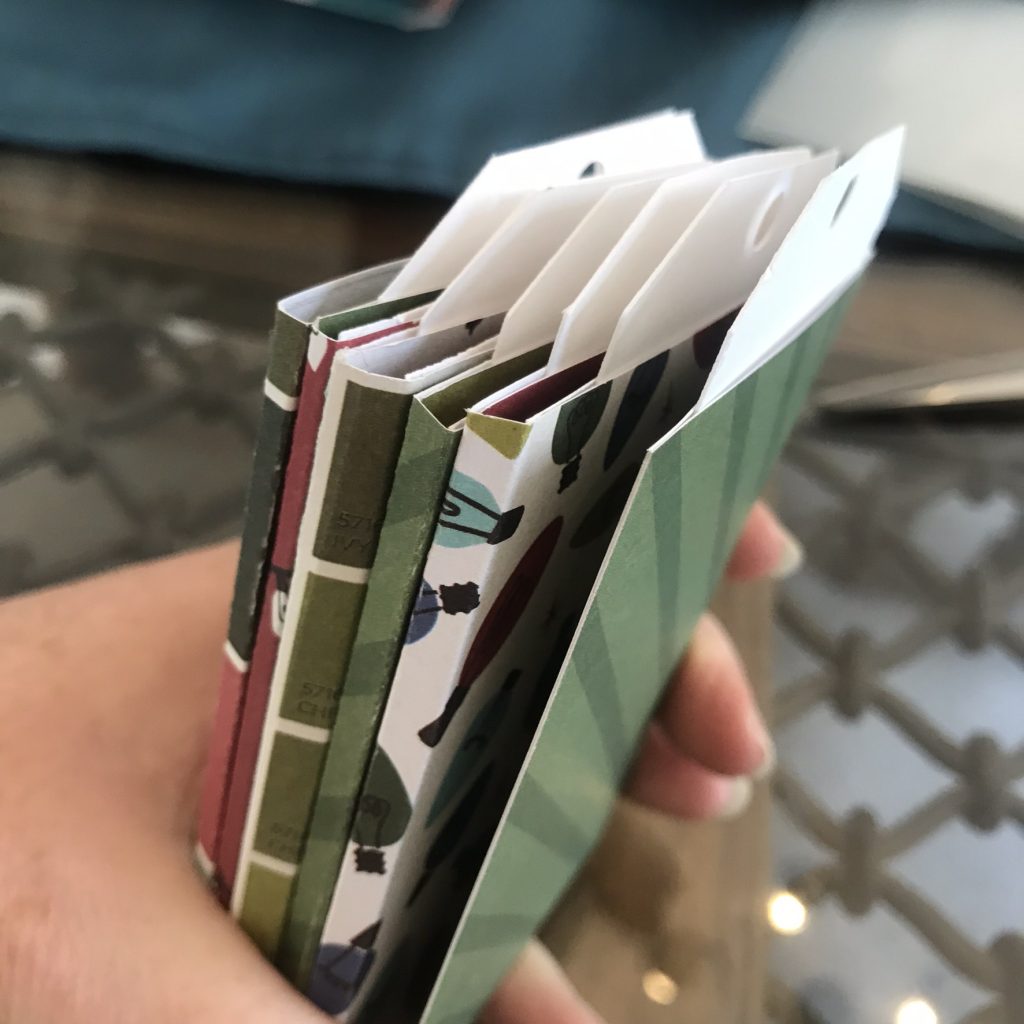
Eventually I ended up with the inside of the album looking as it should, sort of. A long fold out piece with a narrow spine so that you’ve got room to fold and to add photos and papers etc. Now I could start adding stuff in finally!
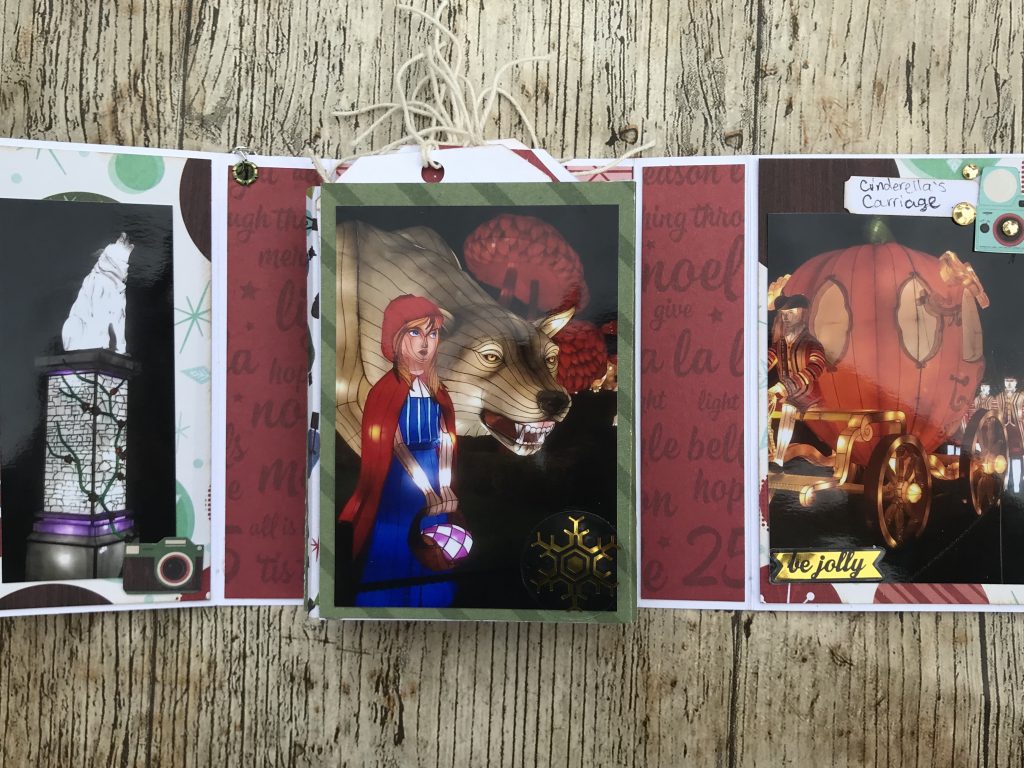
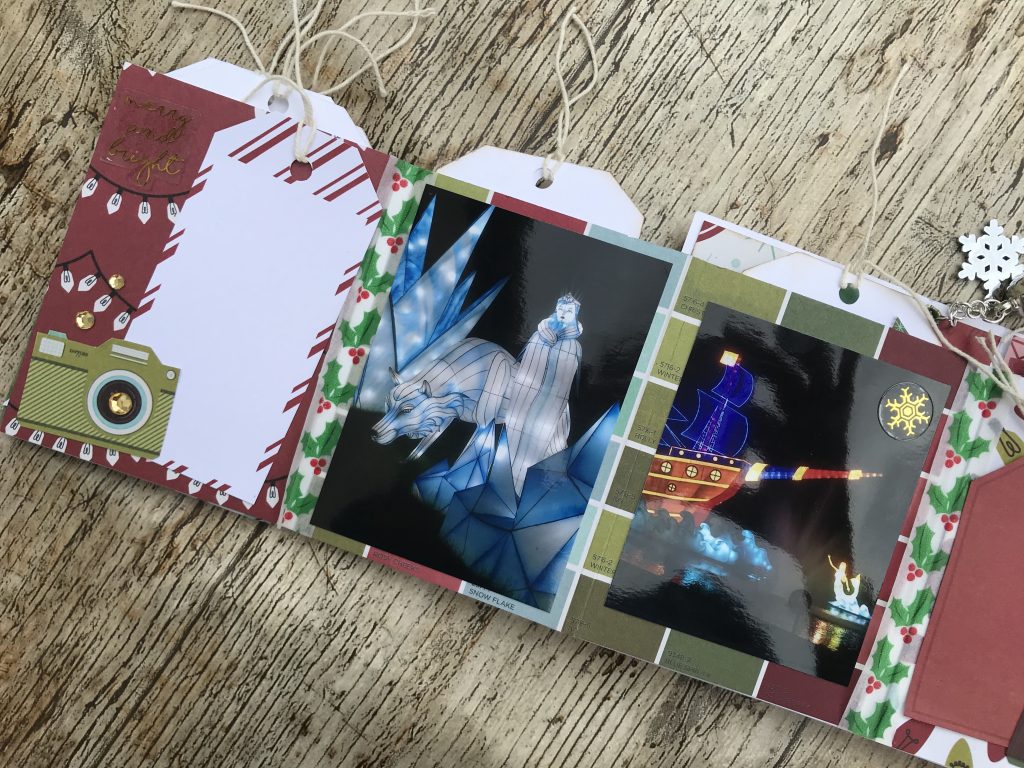
The cover of the album is the plain white template and the file also comes with templates to use for the inside layering pieces so I started with those and tried to find contrasting papers for each section. The accordion then pulls out of the middle, starting with this fabulous lantern of Red Riding Hood.

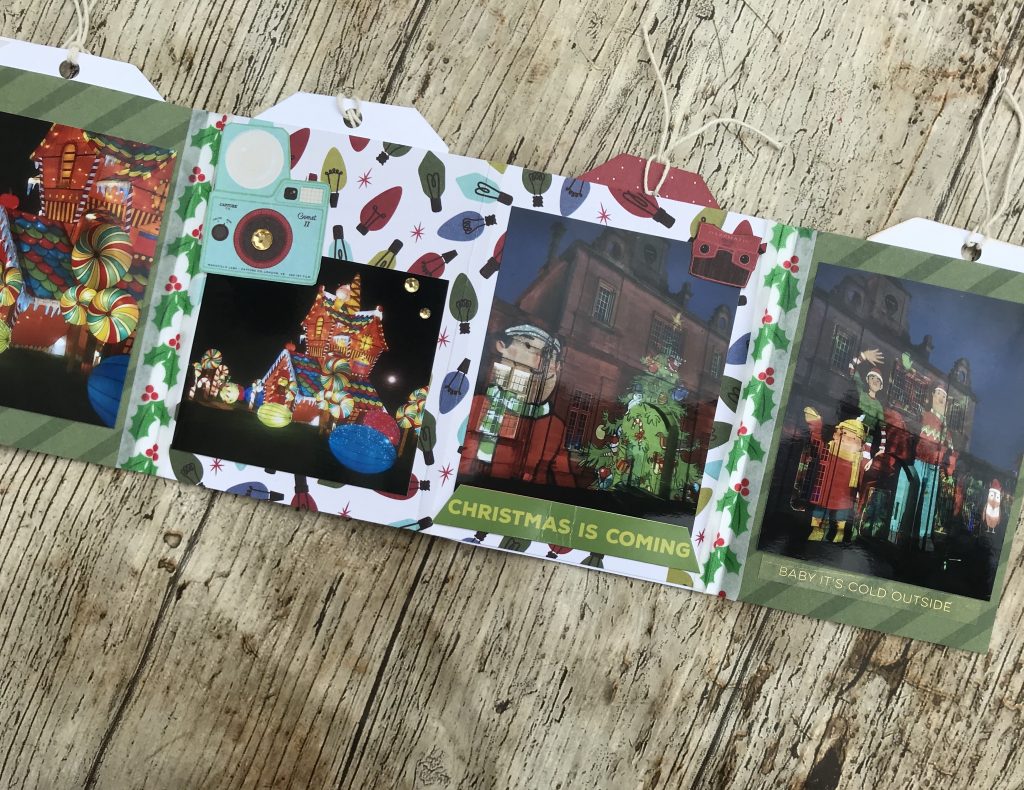
I still need to add the journalling but I made sure there was plenty of room throughout the book. I fussy cut some cameras and envelopes and added the odd gem for a bit of bling.
The actual template uses 6 fold out pages but I created a couple of extras to house all the many photos I took that day. As it happened, all 3 of our phones ran out of charge so there could have been many many more photos otherwise!

I also added a little dangly pretty on the spine using an eyelet for a bit of security and then adding a small chain with a tassel and a snowflake charm from the shop.

The papers are all from Shimelle’s Christmas Magic Collection and I added some clear stickers from Simple Stories into some of the darker areas of the photos.
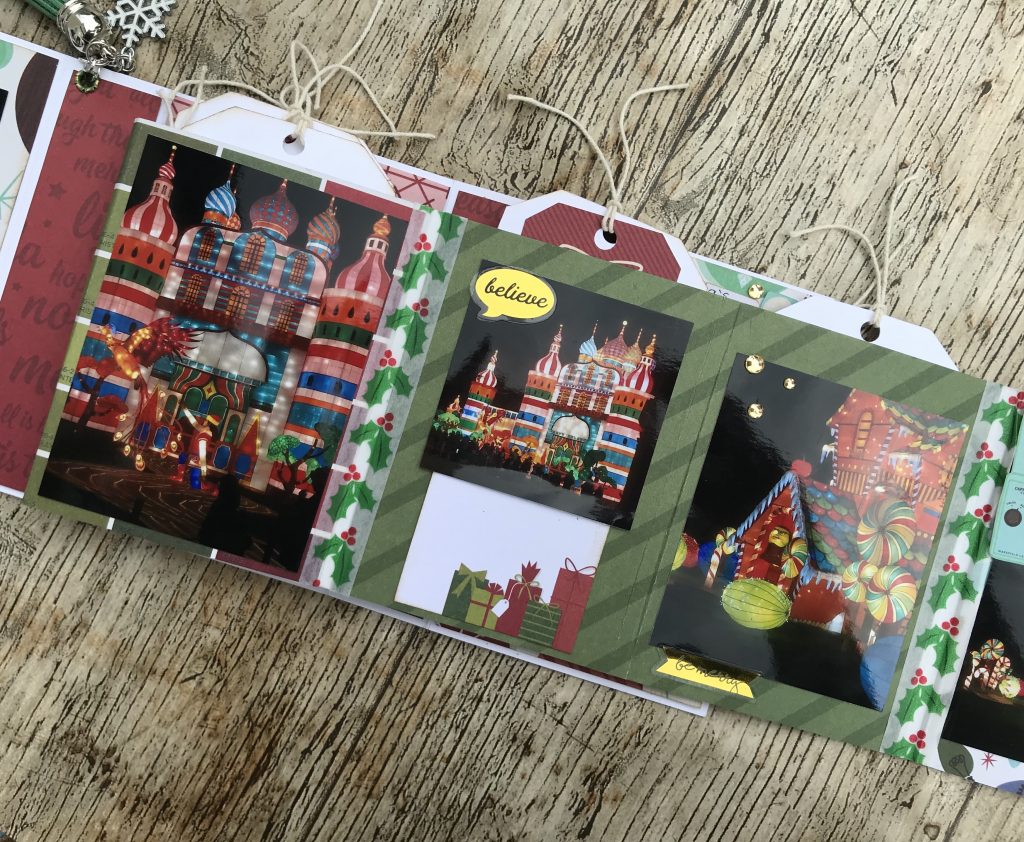
Each of the accordion pages are actually little pockets in which to house your tags for more photos and journalling. I love the texture this adds with all the little strings hanging out.
As you can see I’ve still got lots of room to record all my memories of this special day, which was actually for my mother-in-law’s 80th birthday on Christmas Day.

There were the huge lanterns all around the manor house and then in the central area there was a huge tree which was used to reflect the story being projected on the front of the house. It was really magical and very very clever!

Despite the very warm weather a week or so ago, it’s turned pretty chilly again here so it might feel like the perfect time to finish off a Christmas project. If you are inspired then don’t forget to add it to the relevant album on the facebook group to be entered into the prize draw.
May the scrapping force be with you!
486 /
I’m so excited that Pretty My Page has some COAPA Cut Files for sale! I’m a big fan of Virginia’s designs – especially those that are more masculine as they work great with photos of my nephews. This train is AWESOME!

My nephew knew all of the Thomas engines names and was so familiar with the books that you couldn’t say a single word wrong when reading to him as he’d stop you and start again! If we weren’t playing with trains we were reading about them. I put so much effort in to learning their names but there were so many. The look of disappointment on a two year olds face when you call Edward Gordon is a look that stays with you for a long time.
Right less waffle and on to the layout. I’ve backed the train with various papers from a Doodlebug 6×6 pad. I choose yellows and oranges for the engine as blue and yellow were the two colours that stood out the most from the photos. Orange is blue’s complimentary colour.

I added a little blue ink to the white background using the packaging technique. I choose three bold alphas for my title and subtitle. Despite what the photo tells you, that middle line of alphas is straight. I triple checked after looking at the photos!
You can see the process video here.
449 /